Sunday, December 30, 2012

Olinda

I'm sitting here sewing buttons on what will more than likely be my last FO for the year. Eight little wooden buttons for a sweet cardie for Toby.

I feel like I've sewn a lot of buttons on this last month as I've busily knit away the festive season.
How about you?
Was the last month a crazy frenzy of gift creating?

Before all this crazy gift knitting began, I did release a new pattern. A pattern I love very very much. I mentioned this pattern in the last blog post back at the start of the month. See I've been too busy knitting to even blog!

My new pattern is called Olinda.


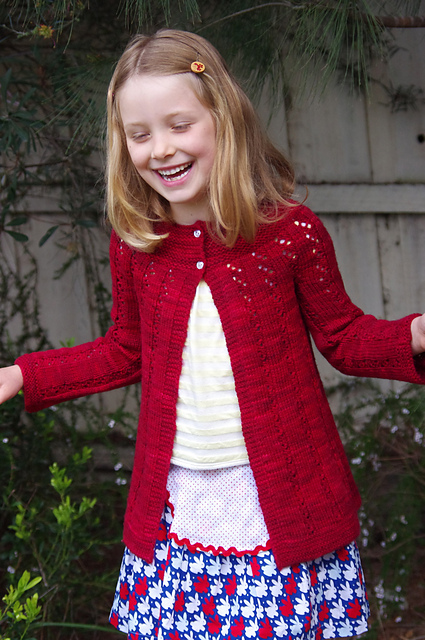
Olinda is a really lovely lace cardigan flowing from a circular garter stitch yoke. It is completely seamless, knit from the top down with lace panels running vertically.

What I really love about Olinda is that it is reversible; while it's not the same on both sides, each side of the garment is equally lovely.

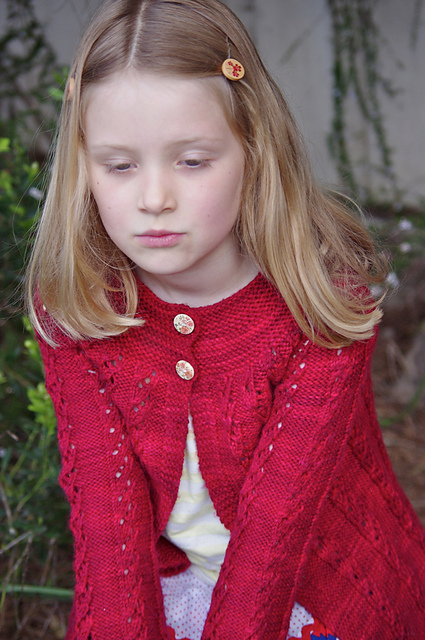
In the photo above, Lily is actually wearing the cardigan what would be considered the wrong side out.

And below here, she's wearing it the right way.
Can you see the difference?


This cardie is named after a sweet little town in the Dandenong Ranges, just outside of Melbourne. I planned to name this cardie after Lily's favourite place. Up until our visit there in July, her favourite place was the Bollards in Geelong!

Olinda is such a pretty little town perched up high in the forest and surrounded with such lush green vegetation. It was like a winter wonderland for our kiddies, they hadn't really experienced weather that cold before. And the possibility of snow while we were there was just unimaginable for them. They fell in love. It is such a far cry in terms of landscape and weather for coastal dwelling folk like us.

While we were there we took the kids up to Lake Mountain so they could experience snow for the first time. What an amazing experience for them!


The lace in Olinda is quite intuitive and easy to follow once you get going. If you're a bit of a stop and start knitter I'd probably suggest using a life line to help you keep track of where you are up to and guard against too many accidents!

Having said that, Olinda is more suited to an intermediate knitter who is comfortable reading their own work. There are places in the pattern where you do need to be able to read what would be the next stitch in the pattern or the previous stitch.

The lace is both in written and charted form in the pattern and options are included to knit Olinda with either short or long sleeves.


Olinda is sized for chest sizes from 15 - 30", in one inch increments so will fit from newborn to around age 12 or so. It is available as a downloadable pdf from my Ravelry store for $6.

Give her some love.

Right now, I'm going to finish sewing on my buttons (I have seven to go!), and then ponder how much I've knit this year. I'm going to get out my scales and weigh those last few items and tally up my knitting yardage for the year.

Will it be more than last year?
What do you think?


Sunday, December 02, 2012

buttons doing double duty

Tomorrow I have a new pattern to release, which is always a very exciting and just a wee bit nerve-wracking kind of a day. There's all kind of hecticness involved as I quite often leave some part of the release to the last minute; such as converting the yardage lengths to metres, or adding the name of the testers or the pattern page for Ravelry. I often feel like I'm fighting the clock and wrangling both the kids, dinner and DK to pull it all together. I'm really not the most organised of people.  And I am so easily distracted.

But anyway, tomorrow I have a new pattern to release, and this time I'm sort of super organised. Perhaps. So much so that I've pre-prepared a little blog tutorial that I want to share with you.

Tomorrow's pattern, Olinda, is reversible in the sense that there's no real wrong side to the garment. You can really wear it either way, which is great for grublets. But to make it so, you really need to sew on what I call "double duty buttons" so you can button the cardie from both sides.

Here's a quick peak of Olinda worn as the pattern is written, there's plenty more pics over on my Rav project page, and I'm sure you'll see more tomorrow.


So how do you make double duty buttons?

You need two buttons for every buttonhole, some good quality sewing thread and a hand sewing needle.

I find this style of buttons works really well for two-hole buttons and I always sew my two-hole buttons on like this.

When threading my needle I always half the thread and thread the two ends through the eye of the needle, leaving the thread looped at the end.


Locate where the buttons need to be placed. I always use the garter ridges in the garter edging and the placement of the buttonhole to help line up where my buttons need to be.

Once you've got the right spot, sandwich the buttonband between the two buttons and bring the needle and thread through the two buttons leaving the loop at the back of the work.


Making sure the loop remains at the back, thread the needle back through the other front hole. The loop and the needle will both be at the back of the work now.


TO secure the thread, simply thread the needle through the loop and pull tight.


Sew on the button as usual, threading back and forth through both buttons securely a couple of times.

To finish off the buttonhole neatly, on your last pass-through with your thread to the back, only go through the front button and come out next to the back button. You will need to angle your needle and the buttons to be able to do this.

Loop the thread around the button, and the thread the needle through the loop a couple of times. Pull the thread to secure. Wrap the thread around a few more times and cut the thread. The tail will be neatly hidden behind the button.


Voila! Neatly sewn buttons perfect for double sided garments!

If you were a perfectionist, you would probably create shanks for each of your buttons as you sew them, but I'm a bit lazy. 


I love this way of doing buttons. I use a lot of two-hole wooden buttons and I find that buttons sewn like this don't come loose. Nor are they placing a lot of stress on the garment itself, as in effect they reinforce each other.

Nice, hey!